Taming a wild digital product
Chapter 2 of “Digital Products from zero to hero”
What is in this chapter:
- blueprint of a digital product development process to follow, even when you are a solo developer;
- practical advice and ideas, my personal way of working learned throughout the years of experience with focus on kick-off the project in Miro (however same flow can be implemented in any modern tools with your personal customization, like Jira, Trello, Linear, etc.)
If you are not familiar with the travel issues I faced with my partner or you are curious how to think about a problem and put it to a simple but effective proof of concept, please check out the previous chapter:

Envisioning the user journey
As I created the Deepnote based solution that spared hours of manual work for me and my partner to find out our next destination for a holiday (we live in two cities hundreds of kilometers apart hence the challenge), we still faced many problems around selecting our favourite city and make our time invested there valuable for us. Last time we read multiple travel websites, top 10 lists of what to do in city X (dozens of these articles), video guides to get a feel about the public transport and life there, etc.
Writing these ideas to a todo list was fine for starting, though it became cumbersome quickly and needed to structure them for an easy overview. And creating many digital journeys in my carrier just left me a bit empty with the pragmatic, engineer-oriented UI of my proof-of-concept Deepnote solution, craving for a more user-friendly experience.
And I remember of so many pet projects I started with enthusiasm and never made it to a useful working state, hence another challenge I needed to solve, how to keep my motivation and focus at the same time?
Side note, none of the pet projects were a waste, it is the best way to gather valueable experience for any craftsmen out there to create and fail to create something working. And indeed, engineers, product owners, designers, we are all craftsmen creating something new from thin air, such a wonderful occupation we have!
Let’s create a simple structure for my mind map: I know many parts need to be an existing service integrated, as a lone engineer working on the project, if a problem is solved by others, I need to reuse it to be able to proceed on a speed that keeps my interest up. (This approach you can use on a project by first discovering what your company has and how to reuse them, if you can combine existing services to new solutions quickly, your managers and leaders will take notice and will support you more in your value creation!)
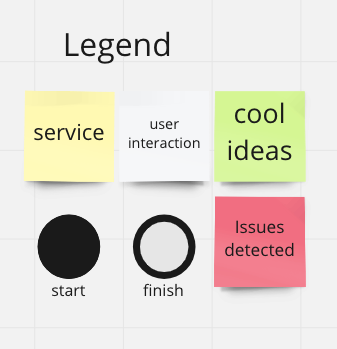
I need to be able to map out how I imagine the user would progress from the initial problem to a final happy state so let’s represent start and finish and the user interactions in between, arrows will show decisions and the flow of the journey. Wherever I am not clear on the exact steps or it is a path that would take me down a rabbit hole, I write down the ‘cool ideas’ and keep their discovery for later. And at this point I already met with challenges of using some services for my problem (during the proof of concept in Deepnote), I need to write down serious issues if it keeps me from solving a problem, so I can refer later and not try again in vain.
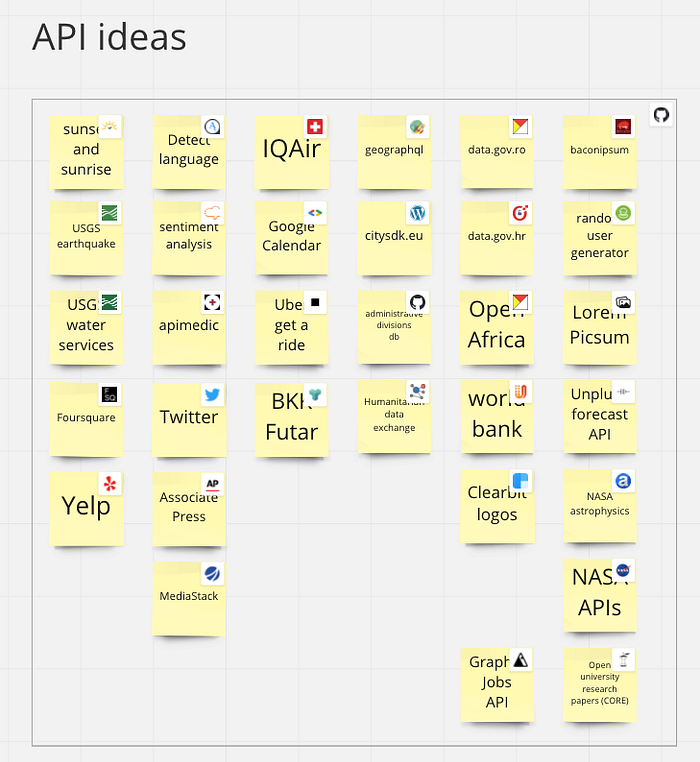
As next step, creating a large bag of ideas always helps me to figure out which direction I can take next, and still keeping with the original focus on available services, I googled some collection of free or trial travel services and found a few great collections, one on Github and many contributors lead to a collection of hundreds of services. I took the time, and read what they are doing and made a little collection of the ones I found interesting besides some ideas from other sources.
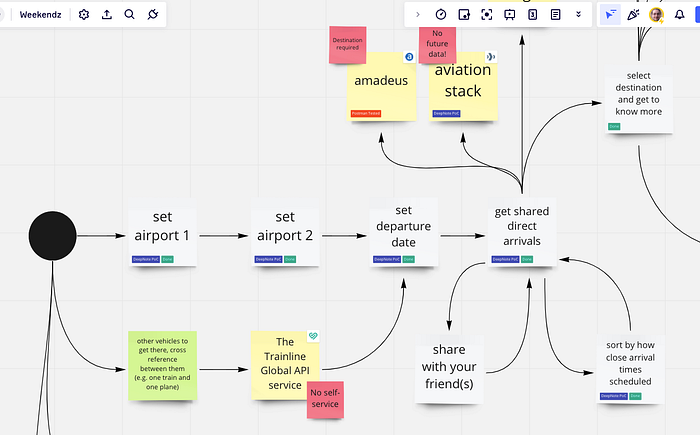
To test the process and iterate on the structure, always start with a part that you fairly confident in as you already solved it. For me it was the first few steps, looking back on the solution, to find our next weekend destination, I needed to enter the departure cities (order does not matter), I get the common served arrivals, select one city out of the options and then input a date for departure and voila, I have the best flight pairs to get there. Writing it down and using a bit of labeling for status management (actually to record for myself that these steps are solved/tested) this is how it looked like:

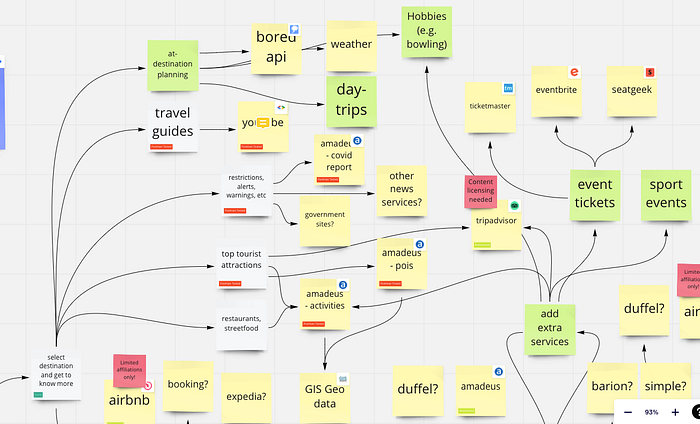
Then thinking ahead, how do I choose a target city? How do my partner choose what’s her next best destinations? These questions are much harder than they sound at first, as thinking back, many times it is just a feeling for me, where my curiousity brings me next, my partner is doing the longer “shopping” style route like comparing top 10 things to do, price, etc. Her version boils down to feelings in the end too. Second level, I can ask, what do we base our feelings on? Actually when you look at pictures, video snippets from another city, you might get an “I want to be there too” feeling and that is it for me! I needed to organize one or two more weekends when I could consciously look at how I choose the city: actually the first one was pictures of the city, then one or two tour guide videos on video sharing paltforms and finally I looked for details on local transportation, restaurants, points of interests, etc. Mapping it out from the city selection and putting in all my ideas or previously liked approaches, like day trips, my branches for the user flow looked like this:
The first step for any good product out in the market, in your hand and daily use, is to come up with ideas. Someone thought this thing would be cool and then took lots of effort to build it. The saying, the idea does not worth anything without the execution holds very much true, but there is no execution without an idea, even if the idea is not original 🙂
Whenever you work in banking, creating the next digital journey or in travel creating a booking application, map out the user journey like a painter plans out his composition on the canvas (and become the user, like you are the one taking the journey yourself!).
Okey, at this point I overstepped the original idea of just selecting our next weekend destination, and as I am my own customer, done over a hundred travels, mostly organized for myself, I know the next steps by hearth: select my flights, make the booking, pay for it, bundle it with a hotel and look for discounts, get the confirmed booking for both, do the check-ins when time is coming and actually, the most important part, travel. Or not to travel but get back my money when every country shuts down due to a global event not yet experienced in my lifetime. Well that is new, however, things happen, cancellations, rebookings and other problems are totally natural and part of (the frequent) traveling life so this could be another interesting part to address with automations, alerts and generally a timely handling instead of the usual news in the papers, another group of tourists were waiting for 7–14 hours for the flight to be fixed, etc.
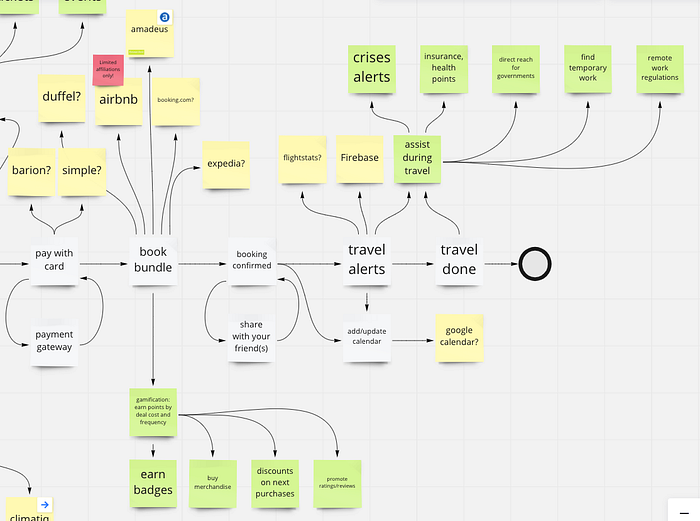
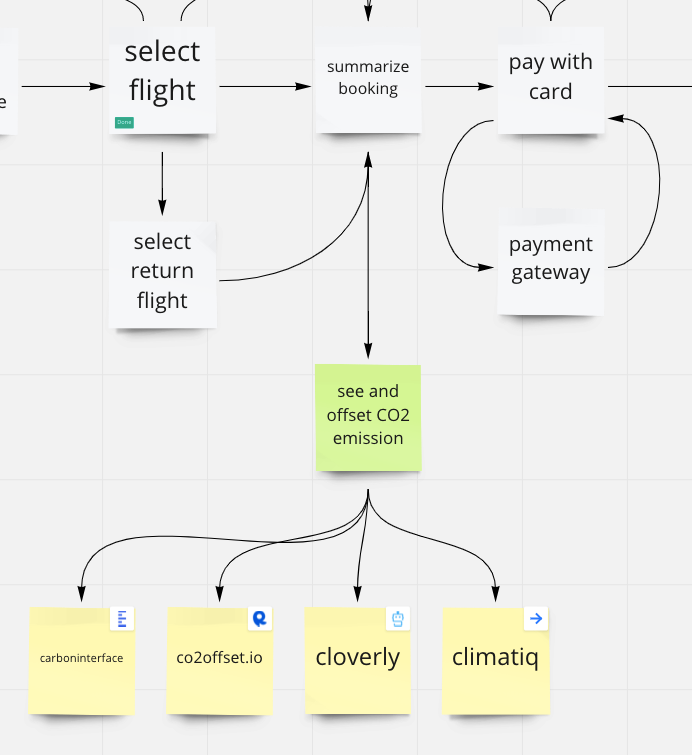
Just for good measure, throw in the fancy gamification, always nice to get some small PNG file for being a crazy fella flying around every week 🙂 Or I am all for sustainability initiatives (I know, I should not fly, the hypocrisy…), so how about if I offset my travel’s carbon footprint until have better ways to use for long range travel? (This carbon footprint and sustainability I will address in its own post in the future as worth discussing the perspectives in depth.)
This became my method for this project from personal experiences and how I would like to communicate in a well structured manner, even just to myself, as I will leave the pet project in the shelf for months then come back and need to be able to pick up the pace in minutes to be able to contribute to it. Each and every project is different, always consider your current environment, team and stakeholders and learn from them and with them continuously on how to communicate and align the best way possible.
You need to present your ideas and why worth the time of others, or even their money if you are trying to convince a potential investor (or a customer, after all they are the bread and butter). And when you move to implementation, being able to map out (as most of us are visual beings, we navigate maps better then walls of texts) and simply show the status and the gaps for each steps are key in any profession, being a tech lead it is essential to keep track of the delivery and where do we go next with the team, and for a product owner equally important to keep ahead with the ideas toward your vision and to flesh them out with the team, test them out with users and move on to delivery if strong evidence shows it works. (Deciding on if it works or not, refer to my previous post on measureable impact!)
Now we know the flow, key steps are written out, and my vision is to create a mobile application both me and my partner can use to solve our problems. However, now the question is, how to get there?
Process from idea to deployed product
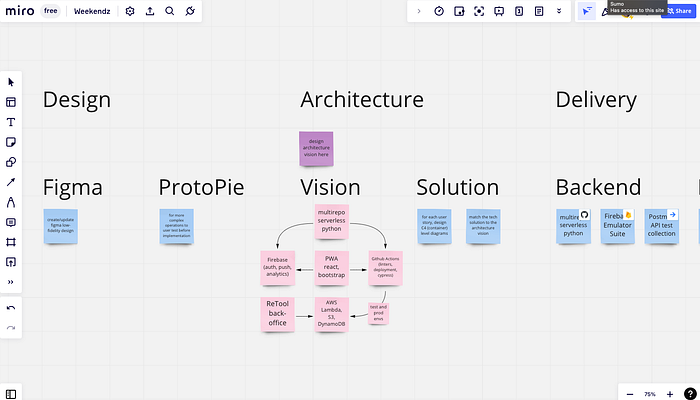
I mentioned in this post many times that we need clear communication on which piece is where in delivery, but you can not have clarity if you don’t know what steps you need to take to get even one gray block from 0 to a working solution so let’s map out our factory or assembly line:
- Idea — the Miro page
- Proof of concept — check feasibility before committing
- Design — envision the end-product’s behaviour
- Solution — details to solve the problem
- Delivery — actually coding it down with tests
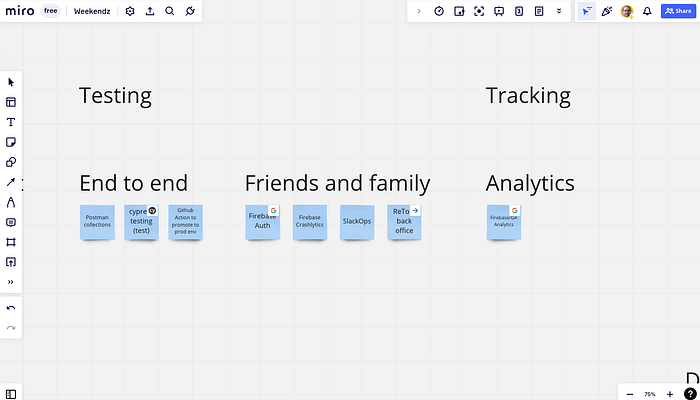
- Testing — trying out the application and affected features
- Tracking — measure how users interact, issues, etc.
Side note on waterfall vs. agile, as in this post and series I would not like to go deep in any of those, the key point is, even in agile, you can have processes, just the working product is more important, with a draft process I can always remind myself like a checklist of what to decide on, while due to situations, complexities and needs, I can decide to not add auto-test or tracking to low-risk, low-reward features or just simple early on, I can change easily my personal process (a.k.a. still being agile, structure is not the enemy of velocity, actually the opposite).
Idea
→ We have that, the Miro page structures it as we went through in detail previously
Proof of concept
→ Is it doable at all? Do we have the tools to reach the goal, with the lowest possible effort?
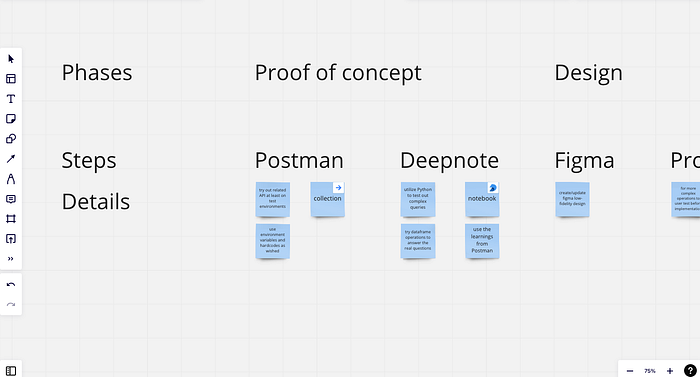
Design
→ Now let’s make the idea user friendly, imagine the end product and still keep the necessary effort low (as there is still a large chance we need to drop the idea, many reasons can play into it, mostly, our first ideas are not the best ones that worth the much larger effort to actually build them and it is perfectly fine as all problems have discovery phases).
We will go into the design of this mobile app in a later post using Figma.
Solution
→ (we could call this part as solution architecture too) As an engineer, flesh out how would you solve this part, still concept only, high level, while detailed enough to get a feel for the effort and to solve most unknown parts. After this step, you should be fairly confident that you can just “type code” and be done with a working product (deploy right after finished typing to production!).
Delivery
→ Where the fun part begins, writing code throughout the entire stack to get the feature you are focusing on written, I usually count the first deployment to dev (or test, uat, whatever you call) environment, where all parts meet and work together in this step and like to fully automate it (no human work needed after you commit the code!).
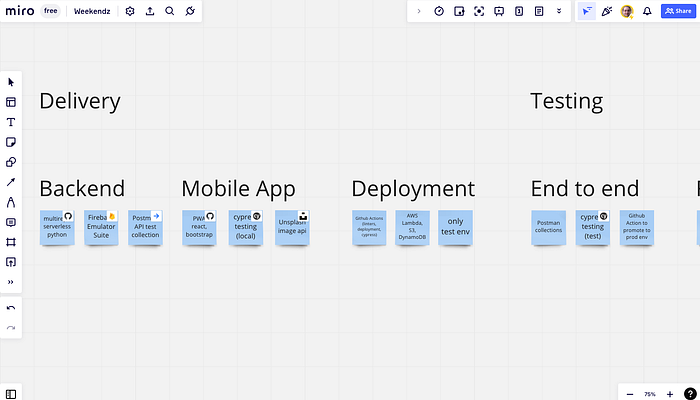
Testing
→ End-to-end testing is the optimal, which means you click through the application and check if all works as expected, even better if automated fully and can promote the result into production automatically (while don’t forget to have a test suite working for your environment and project needs, e.g. unit tests, interface and regression tests, stress and performance tests, etc.)
Tracking
→ Never forget that the job does not end with code being in production but you need to observe it works in the wild, how good it works and react on the learnings, including if the new feature is used by the customers or never clicked on the fancy button you hid behind three pages, or that the customers experience still good performance and you need to intervene by optimization on code level or scaling hardware, etc.
In this series, we will deep dive to each and every topic, for now just taste the high-level concepts, observe their order and imagine it as a factory assembly line, where your first feature moves through molding, from being the idea in your head until it is deployed and works in your hand. And as you enter the first city, then the dates and you look at the tracking dashboard (in my case a Google Analytics dashboard) and you see the first user recorded, spending a minute on the screen. You have your first digital feature in production! Even if it is in just your hand. Or just in your best friend’s hand. Your are in production!
If this fills you with a thrilling sensation of creating a new thing, that helps others in their problems, come with me on this journey in the next chapters about how to decide on the architecture and tech stack and then building our very first application which is not just a proof of concept anymore!
Note, that you can always go back to any earlier stage if you learn something new during creation of the feature and this is a part of being agile! Another huge part of the agile approach is that you take a small enough part from idea to production that it is a valuable increment, not too large that it takes more than a week or two to get it done. This is an extremely complex problem to balance and needs lots of experience, I will point out the crucial experience and tricks you can use to achieve efficient delivery and reduce a lot of waste, you will be surprised that how fast you can move even in large corporations!
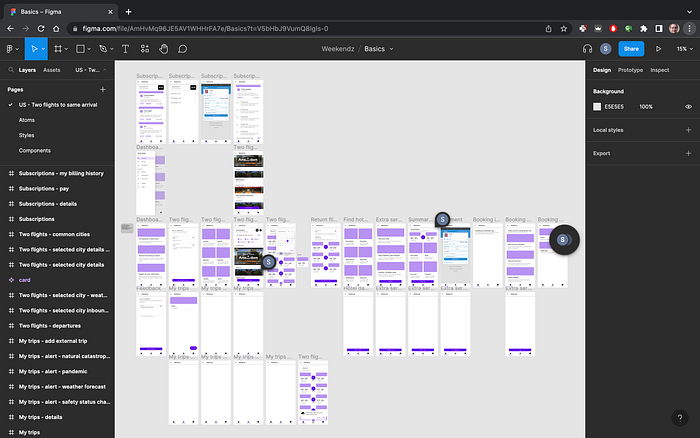
Ps: as I was conjuring up the user journey and the architecture in Miro, started to iterate on the prototype to help myself envision how the application would work and for this purpose I started working on my Figma prototype which we will deep dive in the next post:

Insights
- Setting up the rules for the way you work, even if you are alone, is still crucial for an efficient progress (and to keep your motivation for your pet project), even more important for professional settings and in leadership roles!
- When imagination runs wild, keep the focus by putting new ideas into the backlog (“cool ideas”), sometimes even work on those instead of the next-in-line feature so you keep your mind fresh and excited about the work!
- Feed back to the process the insights you learned from experimenting and communicating with your team, friends and whoever you show your project! Always experiment and experience first hand, this is the best teacher in the world!
- Set up your second dimension, the assembly line from idea to production and you can always represent clearly how each feature progresses to keep yourself (or your team) motivated and stakeholders aligned!
Continue with chapter 3 here: